


| Главная » Файлы » Скрипты плагины и дополнения » Разное |
Регулятор света на сайте с помощью JavaScript
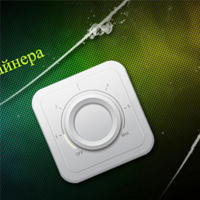
Этот регулятор можно прикрутить к всплывающему окну, при этом его минимизируя, это придаст большой кастомизации Вашему сайту, и так, давайте приступим. Шаг 1. HTML Разметка проста, у нас есть контейнер с классов, к котором мы заключи несколько подклассов, они отвечают за регулятор, строку состояния и окантовку, главный-за отображение всей конструкции: Код <figure class="dimmer"> <div class="wrapper"> <div class="knob"> <div class="center"></div> </div> </div> <canvas class="progress" width="300" height="300"> </canvas> </figure> С разметкой вопросов возникнуть не должно, Вам ее необходимо разместить в том месте, где Вы желаете увидеть данный регулятор. Перейдем к следующему шагу.  Шаг 2. CSS Стили нам помогут отображать регулятор, мы установим параметры контейнера, кроме этого мы сделаем конструкцию самого регулятора, добавим теней и градиентной заливки, что позволит создавать небольшой эффект объемности: Код html, body { height: 100%; width: 100%; overflow: hidden; } body { background: #000 radial-gradient(ellipse at center, #8c8f95 0%, #4e5054 100%) center center no-repeat; } .dimmer { position: relative; margin: 40px auto; width: 300px; height: 300px; border-radius: 50px; background: #eaebea; background: linear-gradient(to bottom, #f3f4f3 0%,#afb0b3 99%); box-shadow: 0px 20px 14px 0px rgba(70,70,70, 0.4), 0px 4px 10px -0px rgba(0,0,0,0.6), 0px -4px 4px 4px #97979a inset; } .dimmer:before { content: ""; position: absolute; width: 300px; left: 50%; margin-left: -150px; height: 190px; top: 0px; border-radius: 50px; background: linear-gradient(to bottom, rgba(243, 244, 243, 0.8) 0%, rgba(243, 244, 243, 0) 99%); z-index: 1; } .dimmer:after { content: ""; position: absolute; top: 22px; left: 26px; width: 250px; height: 250px; border-radius: 30px; box-shadow: 0px -1px 2px 2px rgba(0,0,0,0.3) inset, 0px 1px 3px 3px #f3f4f3 inset; } .knob { z-index: 20; cursor: pointer; } .knob .center { position: absolute; width: 116px; height: 116px; left: 50%; top: 50%; margin: -58px 0px 0px -58px; border-radius: 160px; background: linear-gradient(to bottom, #e7e7e7 0%,#bec0c3 99%); box-shadow: inset 0px 5px 4px 2px rgba(0,0,0,0.35); z-index: 2; } .knob:before { content: ""; position: absolute; width: 164px; height: 164px; left: 50%; top: 50%; margin: -82px 0px 0px -82px; border-radius: 164px; background: linear-gradient(to bottom, #f5f5f5 0%,#a6a7a7 99%); box-shadow: 0px 5px 12px 0px rgba(0,0,0,0.7); z-index: 0; } .knob:after { content: ""; position: absolute; width: 142px; height: 142px; left: 50%; top: 50%; margin: -71px 0px 0px -71px; border-radius: 140px; background: linear-gradient(to bottom, #afb0b3 0%,#e5e7e6 99%); z-index: 1; } .progress { position: absolute; } Шаг 3. JS Теперь добавим немного магии, с помощью скрипта мы установим затемнение, и привяжем его к регулятору: Код class Dimmer raf: null mdown: false mPos: x: 0 y: 0 elementPosition: x: 0 y: 0 target: 0 steps: 50 radius: 150 maxDiff: 150 constraint: 360 maxAngle: 250 currentVal: 0 constructor: (@$context) -> @$body = $ "body" @$knob = @$context.find ".knob" @$handle = @$context.find ".handle" @$progress = @$context.find ".progress" @$center = @$context.find ".center" @$textOutput = @$center.find "span" @ctx = @$progress.get(0).getContext "2d" knobOffset = @$knob.offset() @elementPosition = x: knobOffset.left y: knobOffset.top @centerX = @$progress.width()/2 @centerY = @$progress.height()/2 @canvasSize = @$progress.width() @addEventListeners() @drawLine() @draw() return addEventListeners: () -> @$context.on "mousedown", @onMouseDown @$context.on "mousemove", @onMouseMove $("body").on "mouseup", @onMouseUp return setDimmerPosition: -> @draw() return drawLine: (endAngle)-> @ctx.save() @ctx.translate @centerX, @centerY @ctx.rotate (145*(Math.PI/180)) startAngle = 0 radius = 93 x = 0 y = 0 @ctx.moveTo(98, 0) @ctx.beginPath() @ctx.shadowBlur = 10 @ctx.lineWidth = 2.4 @ctx.strokeStyle = "#fffdcf" @ctx.shadowBlur = 10 @ctx.shadowColor = "#fff" @ctx.arc(x, y, radius, startAngle, endAngle, false) @ctx.stroke() @ctx.beginPath() @ctx.strokeStyle = "#7f7f7f" @ctx.shadowBlur = 0 @ctx.arc(x, y, radius, endAngle, (@maxAngle*Math.PI)/180, false) @ctx.stroke() @ctx.restore() drawSteps: -> steps = 4 @ctx.save() @ctx.translate @centerX, @centerY @ctx.rotate((135*Math.PI)/180) for i in [0..steps] by 1 @ctx.beginPath() @ctx.rotate((180*Math.PI)/180 / steps) @ctx.strokeStyle = "#7f7f7f" @ctx.lineWidth = 2 @ctx.lineTo(108, 0) @ctx.lineTo(100, 0) @ctx.stroke() @ctx.restore() return drawNumbers: () -> steps = 4 angle = (180*(Math.PI/180)) step = (180*Math.PI)/180 / steps radius = 116 @ctx.translate @centerX, @centerY @ctx.save() for i in [0..steps] by 1 x = (radius * Math.cos(angle))-4 y = (radius * Math.sin(angle))+4 angle += step @ctx.fillStyle = "#7f7f7f"; @ctx.font = "bold 13px Arial"; @ctx.fillText(i+1, x, y); @ctx.restore() @ctx.fillStyle = "#636262"; @ctx.font = "normal 12px Arial"; @ctx.fillText("OFF", -84, 75); @ctx.fillText("MAX", 62, 75); return draw: ()-> @$progress.get(0).height = @canvasSize @$progress.get(0).width = @canvasSize endAngle = (@maxAngle*Math.PI)/180 if @target > @maxAngle then @target = @maxAngle @drawLine((@target*Math.PI)/180) @drawSteps() @drawNumbers() @updateBackground() return updateBackground: -> normalizedTarget = @map @target, 0, @maxAngle, 0, 1 gray = parseInt(normalizedTarget*255,10) @$body.css background: "#000 radial-gradient(ellipse at center, #8c8f95 0%, rgb(#{gray},#{gray},#{gray}) 100%) center center no-repeat" return setMousePosition: (event) -> @mPos = x: event.pageX - @elementPosition.x y: event.pageY - @elementPosition.y atan = Math.atan2 (@mPos.x - @radius), @mPos.y - @radius target = (-atan / (Math.PI / 180) + 180) diff = Math.abs target - @target if diff < @maxDiff and target < @constraint @target = target @currentVal = @map(@target, 0, 360, 0, @steps) @setDimmerPosition() @updateOutput() return updateOutput: ()-> @$textOutput.text Math.round(@currentVal) return # Callbacks onMouseDown: (event) => @mdown = true return onMouseUp: (event) => @mdown = false return onMouseMove: (event) => if @mdown then @setMousePosition event return map: (value, low1, high1, low2, high2) -> return low2 + (high2 - low2) * (value - low1) / (high1 - low1) @$dimmer = $ ".dimmer" dimmer = new Dimmer @$dimmer На этом всё! | |
|
Демо Просмотров: 1044
| 17.03.2014, 23:22 |
| Просмотров: 1044 | Загрузок: 1 | Комментарии: 1 | | |
Рекомендую к прочтению


| Всего комментариев: 0 | |
Disqus comments
comments powered by Disqus| HTML | |
| BB-Code | |
| Ссылка |
